RSS

Daily Summary Email for Libraries Based On column Status

How could you send a Daily summary email for all the list items based on column status. Below are few of the ways you can do it. I have written a basic powershell script to do this.

1. Create a custom timer job which would run daily.

2. Create a For each loop in sharepoint designer which would parse through all the items in library and send summary email. The workflow will pause for duration.

3. Use powershell to send summary email.Schedule the .ps1 script to run at 6PM everyday.
option 3 would be the most easiest one. so below is the powershell script

Note: The script is “AS IS”. Please test in test environment before you try in production.

Add-PSSnapin “Microsoft.SharePoint.PowerShell”
$web = Get-SPWeb “https://a.contoso.com/sites/finance/”
$list = $web.Lists[“Shared Documents”]
# Approved  Internally it stores as Numeric value 0
# Rejected  Internally the value of this filed is 1
# Pending   Internally the value of this field is 2

$listItems = $list.Items | ?{$_[“Approval Status”] -eq “0”}
$a = Get-Date
$sysdate = $a.ToShortDateString()
$Approveditemsforday = New-Object System.Collections.ArrayList
foreach($item in $listItems)

{
$Datecompare = $item[“Modified”]
$ApprovedDate = $Datecompare.ToString().split(” “)

if($sysdate -eq $ApprovedDate[0])
{
$Approveditemsforday.Add($item.Name);

}
}

# Pipe Get-Content result to the Out-String to display data in email body. otherwise the data will be in single line
$Approveditemsforday2 = $Approveditemsforday | Out-String

function sendMail{

#SMTP server name
$smtpServer = “smtp.contoso.com”

#Creating a Mail object
$msg = new-object Net.Mail.MailMessage

#Creating SMTP server object
$smtp = new-object Net.Mail.SmtpClient($smtpServer)

#Email structure
$msg.From = “SharePointAdmin@contoso.com”
$msg.ReplyTo = “none@contoso.com”
$msg.To.Add(“smartsharepointguy@contoso.com”)
$msg.subject = “Daily Invoice Approved Summary Email $sysdate”
$body = “List of Invoices Approved for the Date $sysdate`r`n`r`n”
$body += “$Approveditemsforday2`r`n`r`n”
$msg.body = “$body”

#Sending email
$smtp.Send($msg)

}

#Calling function
sendMail
$web.dispose();
 
Leave a comment

Posted by on August 12, 2012 in Uncategorized


Tags: , , , ,

SharePoint 2010 Fine tunning the Crawl Performance on External Content

In many cases while sharepoint is indexing External content it places an additional burden on the system. Sometimes your system admin might come back to you asking the site has come down because sharepoint Crawler has overburden the system with too many requests.

Hence a good sharepoint consultant will always do performance testing and tuning when sharepoint is configured to crawl external systems.

Two major important considerations that needs to be taken care is How large is the external content and How frequent the content changes. Based on that the schedule can be defined in sharepoint to crawl content accordingly.

Two important settings you would take a look from the Sharepoint side is

  1. The crawler Impact Rules
  2. The Search service Application Performance level.

Crawler Impact Rules:

You can configure crawler to request certain amount of items at a time or One document at a time ,wait for a specified interval of time for each host

2.Performance Level of Search Service Application:

If the performance level is set high it’s going to send more requests at a time. You can configure Performance level at a search Application level.

Below is the powershell to change the performance level

$ss = Get-SPEnterpriseSearchService

$ss.PerformanceLevel = “Maximum” (or $ss.PerformanceLevel = “PartlyReduced” or Reduced)

$ss.Update()


Tags: , , , ,

SharePoint 2010 Unable to Upload SWF or JAR files in SharePoint BlockFiles

You verified that this files are not listed in Blocked File Types list but users still complain they are not able to upload the below file types

ascx
asmx
aspx
jar
master
swf
xap
xsf
xsn

MS by default blocks this file types to be uploaded to sharepoint document library. Below is the simple powershell commands to identify which file types are blocked and removing them from this list

$en = “https://a.contoso.com”
$webapp = Get-SPWebApplication “$en”
$blockFileExs = $webapp.WebFileExtensions
$blockFileExs
$blockFileExs.Remove(“swf”)
$webapp.Update()


Tags: , ,

SharePoint 2010 adding Relying Party trusts to Existing Provider

How shall I edit my existing provider to add more Relying trusts? I might create new web applications which needs claim auth from same provider.

Simple powershell commands to do this

$newtrust = Get-SPTrustedIdentityTokenIssuer -identity “Current Providername”

$uri = new-object System.Uri(“https://a.contoso.com”)

$newtrust.ProviderRealms.Add($uri, “urn:sharepoint:hh”)

$ap.Update()


Tags: , , , ,

SharePoint 2010 Claims: Migrating Windows users to Claims users on existing sharepoint site

would like to migrate all  existing web applications from Windows NTLM auth to Claims based authentication using WEB SSO.

We got the Claims provider setup and we tested the web single sign on test user and it is working fine. Now the biggest challenge is migrating the previous users and groups on the site collections to claims users. In sharepoint 2010 when a user or group is added the user or group is prefixed with some additional characters and stored in database. The additional prefix is to identify the user from which Auth provider he is logging in. This makes sense because we can have multiple different types of auth providers configured to sharepoint web application.

In my case for a WEB SSO claims provider the user was prefixed with i:0ǵ.t and group was prefixed with c:0!.s hence a test user and group would be like this

i:0ǵ.t|ProviderName|userloginID

c:0!.s|ProviderName|GroupName

In My case the Provider is Contoso

 Note: The SCRIPT snippet is AS IS. Please test the script in Test to validate. The author will not be responsible for any damages occurring because of this script and hence use at your own risk.

Solution:

Below is the powershell script which migrate the users

$rootSite = New-Object Microsoft.SharePoint.SPSite(“https://a.contoso.com”)

$spWebApp = $rootSite.WebApplication

foreach($site in $spWebApp.Sites)

{

Write-Host “$site”

$url = $site

# get all users in the site, this includes iwindows users

$users = get-spuser -web $url -Limit ALL

foreach($useriteration in $users)

{

$a=@()

$userlogin = $useriteration.UserLogin

# Skip if the user login contains “i:0ǵ.t” for claims users, and also skip your Farm account

if( $userlogin.StartsWith(“i:0ǵ.t”) -or $userlogin.Contains(“_share”) -or $userlogin.Contains(“system”) -or $userlogin.StartsWith(“NT”) -or $userlogin.StartsWith(“Built”) -or $userlogin.StartsWith(“c:0!.s”))

{

continue;

}

# get the user login name

$a = $userlogin.split(“\”)

$username = $a[1]

$us=$a[0]+”\”+$username

# perform the actual migration by getting the user and Move the user

$user = Get-SPUser -web “$url” -Identity “$us”

Move-SPUser -IgnoreSID -Confirm:$false -Identity $user -NewAlias “i:0ǵ.t|contoso|$username”

# Log

Write-Host “converted user kacstmp:$username to i:0ǵ.t|contoso|$username”

}

}

$site.Dispose()

$rootSite.Dispose()

For groups you need to use the below command

Get how group is currently stored by running the below command on the Content database of the site collection

select * from dbo.UserInfo where tp_DomainGroup = 1

Based on the format the current  prefix for windows groups substitute in the below command

$farm=Get-SPFarm

$farm.MigrateGroup(“c:0-.t|contoso\GroupName”,”c:0!.s|contoso|GroupName”)


Tags: , , , ,

Simplest way to Redirect SharePoint 2010 site from HTTP to HTTPS:IIS7


URL Rewrite Module 2.0.URL rewrite module is a plug-in for IIS7 and above that allows to manipulate url’s.

  1. Ensure that the certificate is installed in IIS and the cert is present in the Personal Certificate store of the computer.
  2. Bind the certificate to a SSL port

Open command prompt in Admin mode and go to location c:\windows\system32\inetsrv

And run the below command

appcmd set site “Site name in IIS” /+bindings.[protocol=’https’,bindingInformation=’*:443:a.contoso.com’]

  1. Install the URL REWRITE MODULE 2.0. You can download from MS site.
  2. Add a alternate access mapping in Sharepoint like below

https://a.contoso.com default https://a.contoso.com

http://a.contoso.com default https://a.contoso.com

  1. I assume the site is browse-able now on https. Now I am going to create a url rewrite rule to redirect from http to https
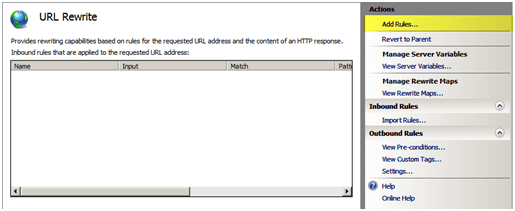
  2. Open the IIS manager. Select the site you want to configure redirect. Go to the featuresPanel and double click URL Rewrite
  3. You will notice there are currently no rules configured for this site. Click “Add Rules…” in the Actions menu to the right of the “Features View” panel
  4. Use the default “Blank rule” and press “OK”.

    When editing a rule there are the “Name” field and 4 configuration pull down boxes.

    – Enter “Redirect to HTTPS” in the name field.
    – Next we will configure the first configuration pull down box called “Match URL”, on the right side of “Match URL” press the down arrow to expand the box.

    Within the “Match URL” configuration box we will set the following settings:

    Requested URL: Matches the Pattern
    Using: Regular Expressions
    Pattern: (.*)

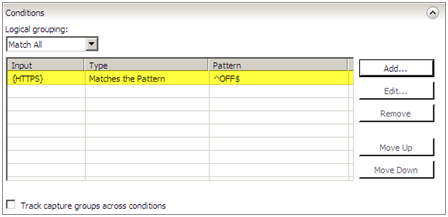
    We can now edit the next configuration pull down box which is “Conditions”, Press “Add…” to add a new condition to the configuration.

    We will configure the condition with the following settings:

    Condition Input: {HTTPS}
    Check if input string: Matches the Pattern
    Pattern: ^OFF$

    Press “OK”

    You should see your condition in the list of conditions.

    For this setting we do not need to configure the “Server Variables” pull down box. Continue onto the “Action” configuration box and pull down the box by selecting the arrow on the right. We will configure the following settings for the “Action” configuration:

    Action Type: Redirect
    Redirect URL: https://{HTTP_HOST}/{R:1}
    Redirect Type: Select Permanent (301)

    Press “Apply” then press “Back to Rules”

    You should now see the rule configured on the main screen of the URL Rewrite module.

    Test your site, it should now redirect from HTTP to HTTPS.

 
Leave a comment

Posted by on July 1, 2012 in IIS, SharePoint


Tags: , , , ,

SharePoint Claims based site very slow

SharePoint Claims based site very slow:

All the SharePoint web front end servers are in enclave network and there is no internet access.

Sharepoint web application has been configured to use claims based authentication.

The login to the site takes more than 2 mins.

What is going on here? Why this incredible wait time to successfully login to a sharepoint claims based site.

Below is what little bit debugging I have done to find the root cause and fix for this.

Took a fiddler trace:

If you notice much of the time is being spent at /_trust/ url of the site. This is nothing but the Sharepoint STS (Token service) to validate tokens and authorize users.

I enabled the CAPI2 logging to find out what’s going on

I find event ID 11: error

ChainElement

–           Certificate

[ fileRef]          F6586B7706BD3BE44CE6453AA6E82A020361A57A.cer

[ subjectName]           SharePoint Root Authority

–           EventAuxInfo

[ ProcessName]           w3wp.exe

–           CorrelationAuxInfo

[ TaskId]          {E4E89B82-25F7-4763-9088-E1B4661044A5}

[ SeqNumber] 19

–           Result  A certificate chain processed, but terminated in a root certificate which is not trusted by the trust provider.

So the Sharepoint security token service validates it own Sharepoint Root certificate that is installed OOB. This certificate will not be installed in “Trusted Root certificate Store”

I looked at the other event ID 53:

URL http://www.download.windowsupdate.com/msdownload/update/v3/static/trustedr/en/authrootstl.cab
[ scheme] http


EventAuxInfo
[ ProcessName] w3wp.exe


CorrelationAuxInfo
[ TaskId] {E4E89B82-25F7-4763-9088-E1B4661044A5}
[ SeqNumber] 17


Result This network connection does not exist.
[ value] 8CA


By this call it was evident that after the CRL validation failed the call is being made online to the Microsoft site to do the CRL validation.

It is good practice to validate to Certificates because their might be some certificates that have been revoked and needs to be validated for security reasons. But in this case even after the validation fails over the internet because the servers are in DMZ the user gets into the site.

One more thing I noticed was for every sharepoint authentication request there was a build chain happening for CRL validation.

Solution:

Note:The certificate needs to be installed on all the web fron tend servers in the Trusted Root certificate Store.

1. Obtain the “SharePoint Root Authority” certificate as a physical (.cer) file

a) Launch the SharePoint 2010 PowerShell window as Administrator

b) $rootCert = (Get-SPCertificateAuthority).RootCertificate

c) $rootCert.Export(“Cert”) | Set-Content C:\SharePointRootAuthority.cer -Encoding byte

2. Import the “SharePoint Root Authority” certificate to the Trusted Root Certification store

a) Start > Run > MMC > Enter

b) File > Add/Remove Snap-in

c) Certificates > Add > Computer account > Next > Local computer > Finish > OK

d) Expand Certificates (Local Computer), expand Trusted Root Certification Authorities

e) Right-click Certificates > All tasks > Import

f) Next > Browse > navigate to and select C:\SharePointRootAuthority.cer > Open > Next > Next > Finish > OK

I had raised this issue with Microsoft and asked them to publish a KB on this issue. Finally we have one

http://support.microsoft.com/kb/2625048

Note: If you’re SharePoint servers are in enclave network and using claims based web application. you need to implement this steps otherwise you will face site slowness.


Tags: , , , , ,

SharePoint 2010 Web Application Using Claims Based Authentication: WEB SSO Federation between Shibboleth and ADFS, Users get “Access Denied” on sharepoint 2010 claims based web application

Issue: Users get “Access Denied” on SharePoint 2010 claims based web application. The users are not explicitly added to the site but they are added via Active Directory Security Groups

Role claims are not working.


How to get Role Claims from Active Directory Store Using ADFS claim rule language.

Background:

Most of the mid sized organizations and Universities around the world use open source federated Identity –based authentication and authorization infrastructure know as Shibboleth. Shibboleth uses the SAML (Security Assertion Markup Language Protocol 1.1 or higher) to exchange security information to achieve WEB Single Sign On (WEB SSO).

Sharepoint 2010 has its own inbuilt security token service application which can validate Claims token and authorize users. The SharePoint token service acts as relying party in other words it’s just a service provider for the tokens.

Sharepoint 2010 cannot directly integrate with Shibboleth. Sharepoint STS cannot validate token generated from shibboleth. Therefore we need another layer in between this two which will generate or transform tokens to be compliant with SharePoint STS. This is where the Microsoft Active Directory Federation Services comes in (ADFS 2.0). Like Shibboleth ADFS is Microsoft product which provides rich SSO features and able to issue and validate SAML tokens.

After I successfully integrated SharePoint 2010 with ADFS and Shibboleth users were still not able to access the site. So where was the problem? I have enabled the ADFS logging and found that the tokens are coming from Shibboleth. why SharePoint STS is unable to Authorize?

After a little bit of debugging I found the solution.

The cause was I am not getting the Role claim ( Group membership of the user) from Shibboleth. I was just getting the Unique Name Identifier which was the login Id of the user. What if groups are added to the claims based SharePoint site. The users who are part of this group will fail to authorize to the site because the claim did not had the group membership in it. Look how I solved this

Configuration:

SharePoint STS : Relying Party or Service Provider

ADFS 2.0: Service Provider or Relying Party

Shibboleth: Identity Provider or Claims Provider

Identity Store: Active Directory

Claim being used: Windows Account Name

Role: Role Claim

Solution:

At the Claims Provider Trust I am getting UniqueName Identifier claim from Shibboleth and doing a claim transformation to WindowsAccountName

At the relying Party trust I am passing the Windows Account Claim as it is.

I created custom rule which is second in the list of rules for each relying Party trust.

The rule is below

I used the Send Claims using Custom Rule template


c:[Type == “http://schemas.microsoft.com/ws/2008/06/identity/claims/windowsaccountname”%5D

 => issue(store = “Active Directory”, types = (“http://schemas.microsoft.com/ws/2008/06/identity/claims/role”), query = “;tokenGroups;contoso\windowsaccountname”, param = c.Value);


In this rule I am taking the Input windows account name and Doing a query on Active Directory store to issue Role claims for contoso\windowsaccountname


Note: This requires a little bit knowledge on Understanding claim rules and claim rule language.


This solves my problem. First users get authenticated at shibboleth side and we get a valid SAML token for that user. We now use that token to get Role Claims at ADFS. Now I can add AD security groups to my Claims based site and authenticate the user using Role Claims


Tags: , , , , , , , , ,

SharePoint 2010 Enterprise search to maintain Exclusion List for Crawled file Types Instead of Inclusion List:

SharePoint Crawler misses to crawl content or does not crawl all the content/ pages.

SharePoint by default provides an included list of file types that needs to crawl by the Sharepoint crawler. However this design is good if you know what content you are crawling and List of file types in the content to be crawled. Consider a scenario where Company would like to use Sharepoint 2010 as Enterprise Search crawler to crawl external content (Intranet/Public). Sites may not be Sharepoint sites. Most of the organizations have lot of content hosted on Apache servers built on PHP or Java. These technologies allow complex URL patterns and thus SharePoint crawler might be missing lot of content

For e.g consider a scenario where page would have a url like this http://test.contoso.com/wiki/test)_ra.1

http://test.contoso.com/wiki/ui.grep.semantic

Notice the complex url pattern of the page. There is Period (.) in the URL. SharePoint will not crawl this page even if we select “Crawl Complex URL”   for that particular host in Crawl rules. The cause is simple. SharePoint treats the last period (.) in the URL as a file extension. Hence for the above two url’s SharePoint will treat it as file with extension 1 and Semantic. We do not have included file type for 1 and semantic.

So what is the one best possible design consideration for companies who would like to leverage SharePoint Search as Enterprise search for the company?  When we leverage sharepoint as Enterprise search we should ensure it crawl almost all the content

  1. Flip the current Search Service Application to Maintain Exclusion File Types list instead of Inclusions list

Steps on how to do that:

  1. Open the PowerShell window for SharePoint with Elevated Privileges

Run the below Command

$sa = Get-SPServiceApplication | where { $_.ApplicationClassId -eq “52547a3d-66ed-468e-b00a-8c4a3ec7d404” }

This will bring the Application Class ID of your current Search Admin App

  1. Run the below command $sa.SetIsExtensionIncludeList($sa.GetVersion(),0);

This will Flip the Search Application to Maintain Excluded File Types

Run the below command in SharePoint Powershell Console

net stop OSearch14

net start OSearch14

  1. Next Removing the existing File Types
  • Again using PowerShell Management Shell or PowerShell ISE
  • Execute the Following: (make sure you replace the “SSA” with the name of your Search Service Application)

$ssa = Get-SPEnterpriseSearchServiceApplication -Identity “SSA”

$content = New-Object Microsoft.Office.Server.Search.Administration.Content($ssa)

$extList = $content.ExtensionList

$list = New-Object System.Collections.ArrayList

foreach ($ext in $extList)

{

$list.Add($ext);

}

for ($i = 0; $i -lt $list.Count; $i++)

{

$ext = $list[$i]

$ext.FileExtension

$ext.Delete()

}

  1. This would give you a clean slate where you can plug in the extensions that you do NOT    want to be crawled. Fast Search Service Application by default maintains an exclusion list and not inclusion list. Below is the list of file types which I have used as Exclusion list. Copy the below extensions to a Excel file with column name “Type” and save it as “types.csv

Run the below Powershell script. This will add all the Excluded file types to search Admin page

(make sure you replace the “SSA” with the name of your Search Service Application)

$ssa = Get-SPEnterpriseSearchServiceApplication -Identity “SSA”

$filetypes=Import-Csv types.csv

$list = New-Object System.Collections.ArrayList

foreach ($file in $filetypes)

{

$list.Add($file);

}

for ($i = 0; $i -lt $list.Count; $i++)

{

$file = $list[$i]

$l=$file.type

$ssa | New-SPEnterpriseSearchCrawlExtension “$l”

}

Run the below command without fail after Excluded list has been added.


net stop OSearch14

net start OSearch14


  1. 4.       Run a full crawl on content source and you should now see all the pages are being crawled except the file types in exclusion list

File name extension

File type

aac

aac document

asf

asf document

asx

asx document

avi

avi document

bmp

Bitmap Image

cab

Cabinet File

com

MS-DOS Application

css

Cascading Style Sheet Document

db

Data Base File

dll

Application Extension

dvi

dvi document

exe

Application

gif

GIF Image

hqx

hqx document

ico

Icon

img

img document

iso

iso document

jar

jar document

java

java document

jpeg

JPEG Image

jpg

JPEG Image

m4a

m4a document

midr

midr document

mp3

mp3 document

mpeg

mpeg document

mpg

mpg document

msi

Windows Installer Package

mso

mso document

ogg

ogg document

pdb

pdb document

png

PNG Image

prz

prz document

ra

ra document

ram

ram document

rpm

rpm document

swf

swf document

sys

System file

ttf

TrueType Font file

vmarc

vmarc document

wav

wav document

wma

wma document

wmf

WMF File

wmv

wmv document

wrl

wrl document

 
Leave a comment

Posted by on July 1, 2012 in SharePoint


Tags: , , , , , , , ,

 
Design a site like this with WordPress.com
Get started